
Spring crafts are always fun to do with your little one. They can be messy, but so much fun! Have a look at the list below of 10 Spring Crafts you and your little one can do together
Veggie Hand Painting

What you'll need:
- Paper
- Orange and Purple Paint
- Paint Brush
- Scissors
- Green Card
- Googly Eyes
- Black Pen
How To:
- Paint your little one's hand orange and purple for the carrot and the beetroot, and print these onto some paper.
- Paint the pointy part of the beetroot
- Cut green and leafy shapes for the beetroot and carrot
- Paint on the beetroot leaves purple lines, this could be with a paint brush or the edge of a piece of paper
- Add some googly eyes and a small smile
And you're done!
Click Here to go to the original poster.
Egg Painting

This activity can take around 45 mins (If your little one is really focused).
What you'll need:
- Hard-boiled Eggs or Wooden
- Egg Cartons
- Jars or Cups
- Liquid Watercolour (a gold watercolour can look really pretty with this) or Diluted Food Colouring
- Old toothbrushes
- Mini Stickers and white crayons (optional)
- Plate and Kitchen Roll, to lay eggs in while they dry
How To:
There aren’t really any instructions for this, let them have a bit of fun!
Maybe show how they can splatter the paint and use the crayon with the paint if you’ve got it.
Click Here for the original blog article at the ARTBAR
Stained Glass Sun Catchers

What you'll need:
- Tissue paper, cut into squares
- Suncatcher outline
- Sticky Back Plastic, or contact paper
- White or Black Card
- Scissors
- Pencil
How To:
- Download and print out the templates linked to white cardboard
- Cut out the shapes, and use the black card to outline the back of the printed paper
- Place the outline onto the sticky-back plastic, and make sure the black outline is facing down!
- Let your little one decorate with tissue paper!
- Add the other outline on top of your shape and seal with the other layer of sticky back plastic.
- Cut around the frame to neaten up your little one's craft
You're all Done!
Click Here to see the original article and template for the activity
Cotton Ball Rainy Cloud

What you'll need:
- Cotton Balls
- PVA Glue
- White card
- Scissors
- Google eyes
- Blue paint
- String
How To:
- Cut out a cloud shape from your white card
- Glue the cotton balls and googly eyes onto your cloud
- Paint some card blue
- Cut out raindrops
- Attach the string to your cloud and glue on your raindrops
Enjoy your cute rainy cloud
Click Here to look at the original article
Worm & Water Growing Experiment

What you'll need:
- Kitchen Roll
- Washable pens
- Glue Stick
- Black sharpie
- Water
- Straw/ Pencil / Skewer
- Pippet (optional)
Click Here for instructions on how to create your very own Worm and Water experiment
Butterfly Puppet

What you'll need:
- Plastic Sheet, like the front of a clear plastic folder, strong but bendable and see-through
- Wooden Spoons
- Acrylic Paint
- Paint Brush/ Sponge/ Cotton Buds
- Pipe Cleaner (optional)
- Coloured Yarn (optional)
- Beads
- Black Marker Pen
- Scissors
- Hot Glue
How to:
- Outline butterfly wings on paper, making sure they are larger than the wooden spoon.
- Trace the butterfly template onto the plastic sheet and cut out the wings.
- Now it's time to decorate! Use paints to decorate the wings with symmetrical patterns
- Decorate the wooden spoons while the wings are drying with the yarn, paints, pens or tape.
- Give your spoon a cute face with the black pen
- Make the antennae with an 18cm piece of pipe cleaner. Fold in half and add a colourful bead to each end. To secure the antenna to the butterfly, its reccomended to use hot glue, any strong glue should also work.
- Hot glue the spoon to the wings of the butterfly to finish making your beautiful flapping butterfly
Click Here for the original article
Fork Flowers

What you'll need:
- Acrylic Paint
- Wooden Forks
- Paint Brush
- Paper
How to:
- Set up paint and paper for your little one to begin creating some beautiful fork flowers.
- Help them paint some stems and leaves for the bottom of the flower with a paintbrush
- Then encourage your little one to dip the fork into the paint and print onto the paper to create a tulip shape.
- Let it dry, and you have a beautiful tulip painting.
Hatched Egg Chicks
What you'll need:
- Card
- Yellow and Orange Paper
- Paint
- Any decorations
- Scissors
- Googly Eyes
- Glue
- Brad Fastner
- Tape
How to:
- Cut out egg-shaped ovals from some card
- Let your little one paint/ decorate how they'd like.
- Once their masterpiece is dry, cut the egg in half, like a cracked egg.
- Cut out circles of the yellow paper for the body of the chick, don't forget the feather floof on top of its little head.
- Cut out a small diamond out of orange paper and fold in half for the beak.
- Add on some googly eyes.
- Attach the egg halves from the corner using a brad fastener
- Tape or glue the chick to the back of the egg
- You and your little one have now made a cute chick!
Click Here for the original article.
Lolly Pop Bracelets

What you'll need:
- Large Wooden Craft Sticks
- Sturdy Glass Jar
- Hot Water
- Decorations for Bracelet, e.g. Washi Tape, Glitter, Embroidery Thread, Rhinestones, Buttons, Paint, Stickers
How to:
- Soak lolly pop sticks in hot water for at least 30 minutes, soak more sticks than you need, as some may snap.
- Once the sticks are pliable, carefully bend the lollipop stick. If they aren't bending, place them in hot water again for another 15 minutes.
- Bend the stick to fit inside the rim of a sturdy cup or jar.
- Let the sticks dry overnight.
- Now decorate your lolly pop bracelets however you'd like.
Click Here for the original article
3D Paper Flowers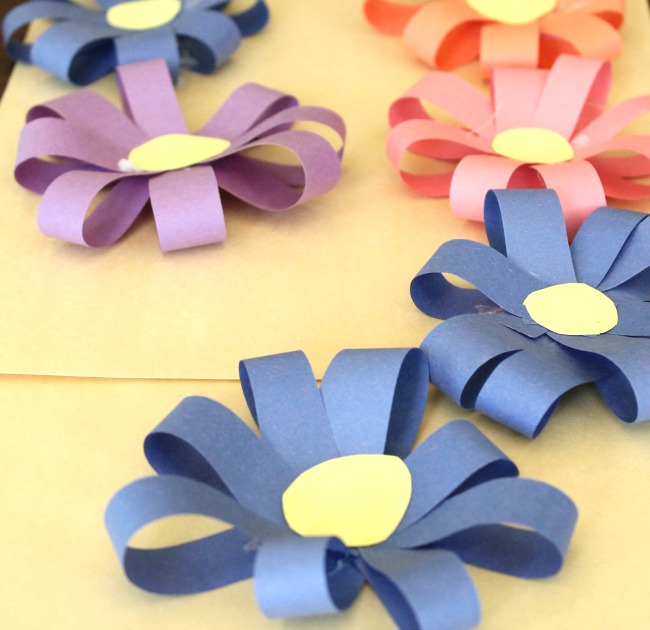
What you'll need:
- Thin Strips of Coloured Paper
- Glue Sticks
- Yellow Paper
How to:
- Cut out the strips of coloured paper and circles for the centre of the flower.
- Lay down a strip of paper and add a dot of glue to the middle
- Lay a second strip across from the previous horizontally, then add another dot of glue to the middle.
- Repeat the previous two steps until you have added four strips of paper.
- Bend each strip of paper in the middle and secure with glue.
- Once all petals have been glued to the centre of the flower, glue the yellow centre onto the flower.
Click Here for the original article.
Hopefully, you have found some inspiration on what crafts you and your little one can have a go at in these warmer months.